Hey mama!
Wondering why and how to start a mom blog in 2020?
Have you ever thought about creating something amazing that also gives you the financial freedom to live the life you’ve always wanted?
Dumb question. Who hasn’t?!
But how do you get there?
Well, one awesome way is to start a mom blog and make money?
I toyed with the idea of how to become a mom blogger for years but there was always an excuse for why I couldn’t start.
- I don’t have money to throw away – we’re tight as it is!
- I’m not a techie! I have no idea what to do with “the google” and other techie things
- I don’t even know where to start
- I don’t even have time to shower, how in the world would I find time for this?
Sound familiar?
If you want to start a mommy blog but all these things are holding you back, keep reading!
Disclosure: I earn a commission from Host Gator if you use my referral link to make a purchase at no extra cost to you. Thanks for your support.
ADVICE FROM A MAMA WHO’S BEEN IN THOSE SAME SHOES
This was literally me just 3 years ago. Contemplating and making excuses. I wasted at least a year doing that.
Don’t be like me!
Here’s what I wish someone had said to me then:
JUST DO IT! STOP OVERTHINKING AND JUST DO IT!
Stop with the excuses and just give it a try. It’s one of the cheapest investments you can make in yourself that has a potential for HUGE returns!
I spent around $100 my first year to start my blog in 2019 and guess what?!
I can officially say I’ve quit my day job! One year into this thing and I’m making more than I ever did at my day job.
WHY START A MOM BLOG?
There’s probably 100 reasons I thought of for not starting a blog but most of those really boiled down to the fear of failure.
I didn’t want to waste money I didn’t have just to fail.
So take failure out of the equation.
I told myself that failure was not an option and we were going to tough it out until we saw results.
IT GIVES YOU THE CHANCE TO BE A SAHM (OR SIMPLY SPEND MORE TIME WITH THE KIDDOS)
My main reason for wanting to start a blog was because of my little guy. I was loving maternity leave and I just couldn’t imagine leaving him with a stranger and going back to work.
I’ve waited my whole life to become a mom and I wasn’t ready to give up that time with Nav.
He’s only this little for so long. It goes by way too quickly and I didn’t want to miss him growing up.
Hands down, best decision I ever made.
A CREATIVE OUTLET
I don’t know about you but I felt like I lost a bit of me after being a mom. Especially that first year. It’s all consuming. No showers, no sleep, no life.
You remember.
As much as I love motherhood, I still needed a little something that was just for me. I’ve always loved writing (and reading) so a blog was a natural choice.
It allows me to get back to my creative roots and create again.
Plus, you can blog about almost anything you know and love. It lets you get back to the things that spark your passion.
For me, I combined the two things I absolutely love: motherhood + writing.
FINANCIAL FREEDOM (BE YOUR OWN BOSS)
Why should we work our butt off to make somebody else rich?!
I love that, now, every minute of hard work I put into my blog means more money in my own pocket.
I don’t mind waking up early to work on blogging or staying up a little late to finish a post. At the end of the day, it’s all for us.
Even in the face of CO-VID, we’ve been able to keep going where as many brick -and-mortar businesses have had to shut down.
It’s an amazing feeling to know I’ve started something myself and it’s growing enough to allow me the freedom to live the life I’ve always dreamed of.
As I mentioned earlier, I’ve quit my day job and we’re well on our way to retiring my husband soon enough!
It’s tough these days to survive on a single income so I can understand that many moms HAVE to return to work (not always because they want to).
Even if you are working, this is a great side hustle to start that can eventually help you quit your day job too (if that’s what you’re after) or simply put some extra money in your pocket.
FIND YOUR MOM TRIBE
Another awesome thing about blogging is connecting with other mommy bloggers.
There’s tons of us out there!
I’ve met so many wonderful, helpful and simply amazing moms on this journey.
Sometimes, being a SAHM can feel a little lonely (especially if you have a baby who can’t quite talk yet). This is such a great way to meet other moms (sometimes even in your area) and connect over all things motherhood and blogging.
When you get stuck, you have a whole tribe to turn to.
Hopefully, I’ve convinced you to take a chance on yourself and give it a go!
FAIR WARNING: THIS IS NOT A GET RICH QUICK SCHEME!
It requires hard work, self-motivation, consistency and perseverance but it’s definitely doable.
Let’s jump right in and I’ll walk you through setting up your own blog step-by-step.
STEP 1 DECIDE YOUR MOM BLOG NICHE
WHAT’S YOUR PASSION?
First thing’s first, what will you write about? What’s your passion? I strongly encourage you to find something you love so you don’t get burned out.
The main reason I’ve been able to keep pushing through is because I love the topics I write about (mainly babies, toddlers and parenting).
When I initially started, I wasn’t sure what I wanted to do so I was writing about everything under the sun (beauty, makeup, fashion, recipes and parenting).
You don’t want to do this! Lifestyle blogs are harder to rank on google than ones that are more niched down to a specific category.
If you’re unsure, you can always start broad like I did and then narrow down as you write and figure out what you want to do.
That’s what I did and I found myself gravitating to blogs about motherhood.
CAN YOU MAKE MONEY FROM IT?
Once you figure out what you want to write about, make sure it’s something people are looking for. You can’t make money if nobody is reading your content.
Hop over to pinterest and google and type in your topic. See how many results you get. If there’s a ton of search results showing up, you should be just fine.
SOLVE A PROBLEM
Blogging has changed a lot from what it was. People used to write about themselves and their life, sort of like a journal. This isn’t how blogging works today.
The cold hard truth is nobody cares about us (unless maybe you already have a huge social media following).
So they won’t be coming to read about your day. Instead, focus on problems that your readers are likely to face and help them solve it.
This is why they’re coming to your blog. It’s very much a, “what’s in it for me?” situation.
STEP 2 MOM BLOG NAMES
Now, for a little fun! It’s time to name your blog.
What’s your url going to be?
A little pro tip, it helps if the blog name has a popular keyword from your niche. I didn’t know this when I started so I just used my own name.
Don’t spend forever on this though. I was stuck for a while which is why I gave up and just used my name.
Jot down a few favorites and google them to see if they’ve already been taken or not.
STEP 3 CHOOSE A HOST
What the heck is web hosting you ask.
It’s simply where your blog lives on the world wide web.
There are so many hosts you can choose from so feel free to do your research.
You might be tempted to just start a free blog instead of paying to self-host your own blog.
Let me stop you right there!
The main reason you don’t want a free blog is because you don’t technically own it. The platform you use to create your free blog owns it so they can decide to take the whole thing down if they decide you went against some policy of theirs.
The other thing is that since you don’t really own it, you can’t monetize it with ads. So if you’re in this to make some cash, you’ll have to be willing to invest some money first.
Personally, I chose Host Gator to start my blog. So, I’ll be walking you through how to set up a website with them.
As a new blogger, I did quite a bit of research and ended up choosing them for several reasons:
♡ Super Easy To Use
♡ Simple click and install for WordPress
♡ They offer some of the most affordable rates that are perfect for new bloggers who don’t have a ton of money to spend (plus the renewal fees are actually reasonable compared to many of the other guys who double or triple the rates after the first year)
♡ Offers a 45 day money back guarantee
♡ They offer awesome discounts when you initially sign up
♡ Free SSL Certificate
♡ Awesome 24/7 customer service support if you have issues with your blog
CHOOSE YOUR HOSTING PLAN TO START A MOM BLOG
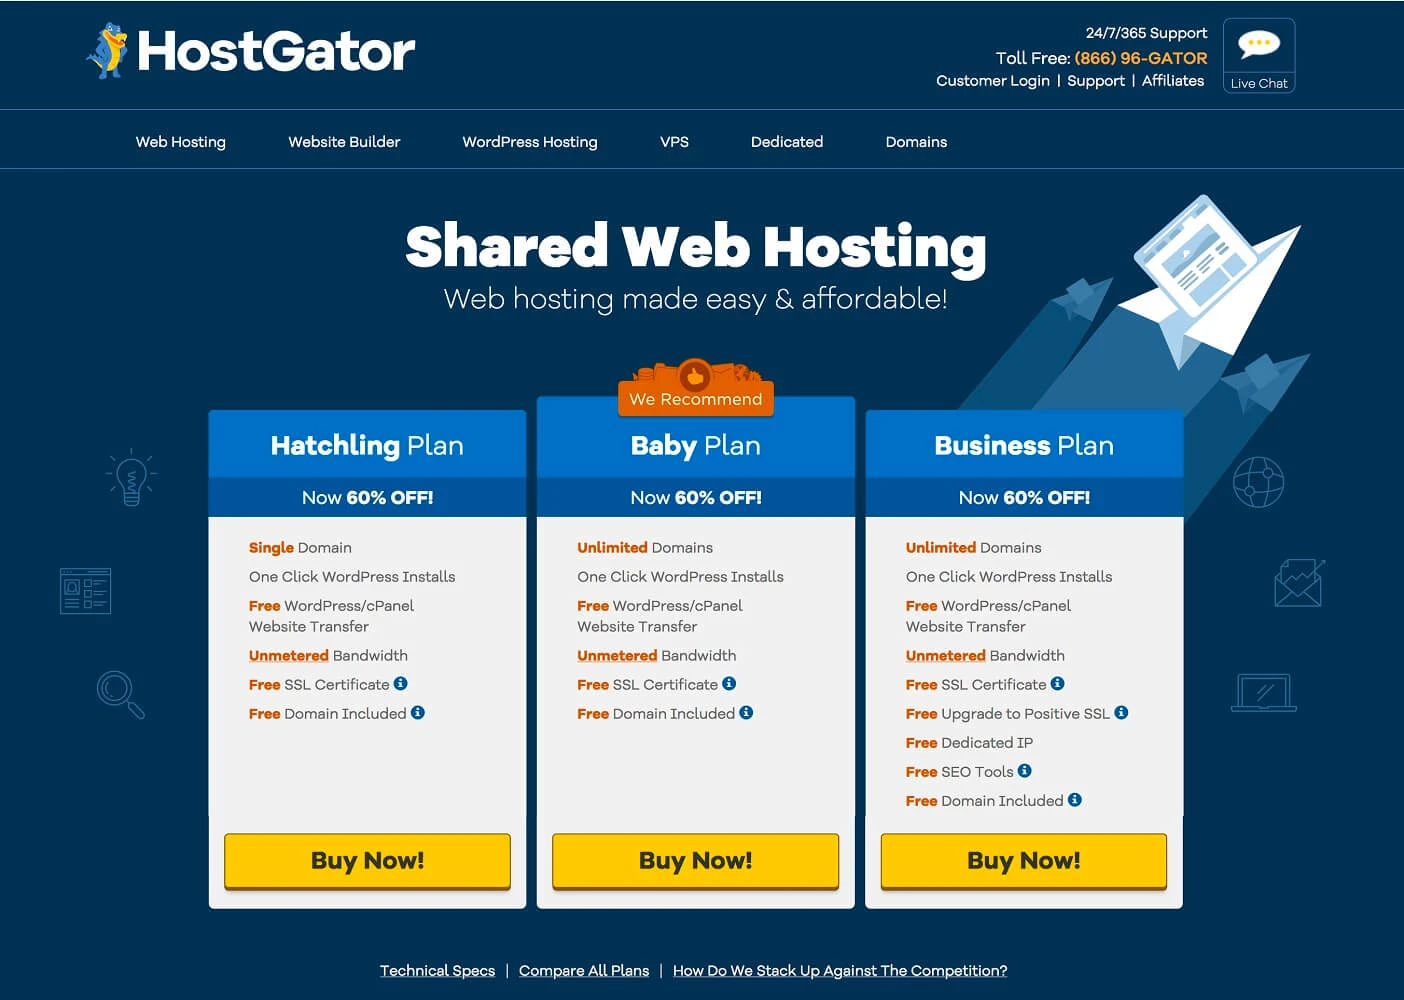
If you’re just starting off, the Hatchling Plan should be more than enough. That’s the one I went with and am still using today.
As your site grows, you may need something faster later on.
You can choose to pay monthly or even pay in advance for 1, 2 or even 3 years. I went with 1 year but wish I had done the 2 or 3.
Keep in mind, you only get the crazy cheap discount the first time around and then renew at regular rates so it’s well worth the money to go ahead and buy at least a year or more.
REGISTER YOUR DOMAIN NAME

Normally, you will pay for your domain name but since I purchased my hosting with Host Gator for a year, they gave it to me FREE for the first year.
You can certainly go with their free one for the year if you decide to purchase through my link or you choose to pay for your domain name separately elsewhere.
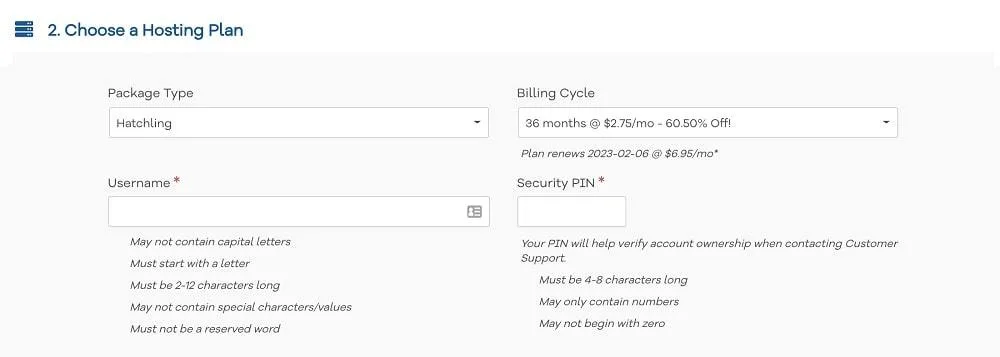
Next you’ll be asked to create an account and password to manage your account like what you see below and confirm your selections:
After that, you’ll be asked to enter your billing info and asked if you want to purchase any additional add ons.
SPECIAL DISCOUNT FOR MY READERS:
I’ve been able to obtain a special exclusive discount code for my readers to give you an ADDITIONAL 25% OFF on top of the already discounted price!
In the next step, enter code CENZERELYYOURS25

After that you just checkout and are now the proud owner of your very own mom blog! Congratulations!!
I’m not going to abandon you right there.
Let’s go ahead and actually set up your website. There’s lots of blogging platforms to choose from but one of the most popular and easy-to-use ones is WordPress.
STEP 4 SET UP WORDPRESS
I’ll outline the steps below but if you prefer a video tutorial, you can check out this one below:
When you completed your purchase, you should have received an email from HostGator with your cPanel username and password. Make sure to store this info in a safe place!
cPanel is the portal you’ll use to manage your web hosting.
The cPanel link is unique to you, so be sure to bookmark it for future reference.
Go ahead and login to your cPanel, then navigate to the section that says SOFTWARE and click the icon that says QuickInstall.
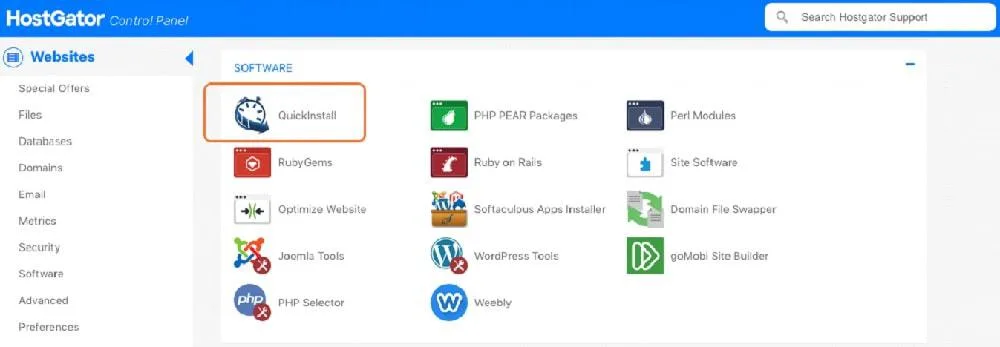
Now, you should see an option to install WordPress for free. Go ahead and click on that.
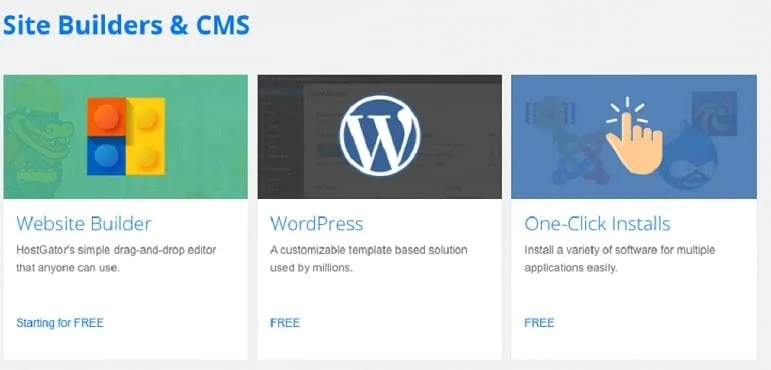
Now, select your domain and hit NEXT.
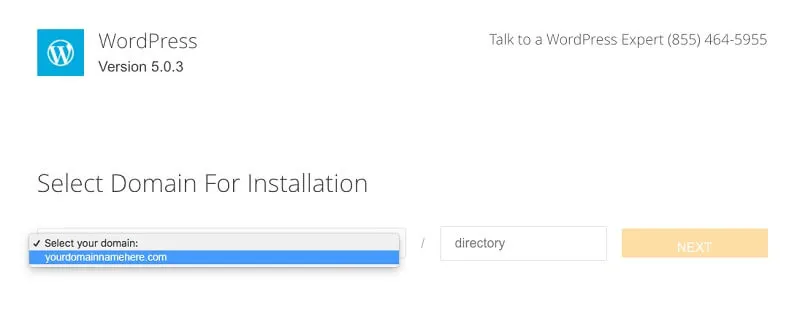
It’s time to put in your settings to sign up for WordPress. It’ll look like this:
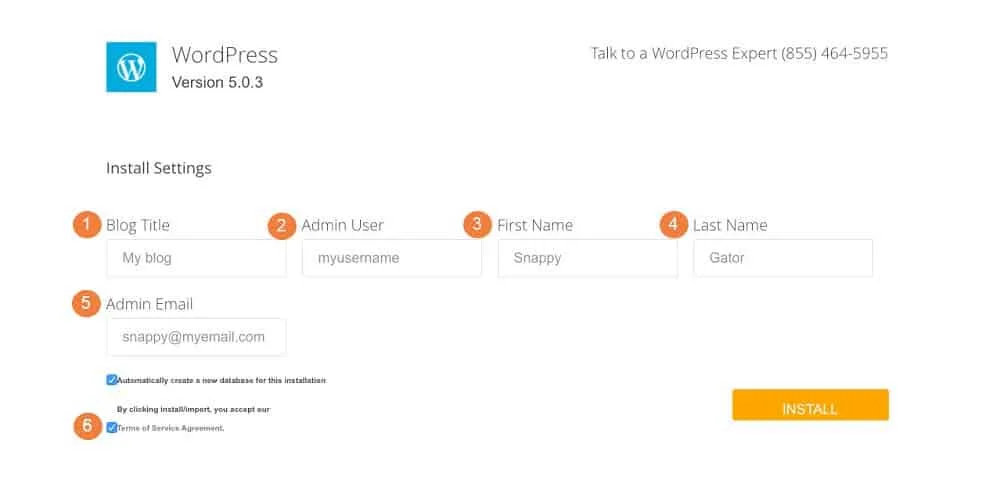
- BLOG TITLE: Enter the name of your website, this is what’s going to appear in the header as the name of your blog
- ADMIN USER : create a unique user name you’ll use to login to WordPress. Just don’t use ADMIN as the name, that’s the default one that a lot of people use and hackers try when hacking!
The rest is pretty straight forward : first/last name + email addy and hit INSTALL!
You’ll see a progress bar at the top that’ll let you know when installation is complete.
Go over to your email that you used to sign up and you should receive an email with the login and password you created as well as a link to your new WordPress dashboard.
Go ahead and look around!
STEP 5 CUSTOMIZE YOUR MOM BLOG WITH A THEME
Your theme is basically the look and layout of your blog. There’s a ton of free ones to choose from as well as more fancy pants paid options.
Don’t get too bogged down on this like I did. You can always change your theme later if you don’t like what you see.
The most important thing about your site isn’t how it looks but rather how it performs.
What you need is a fast website that’s desktop AND mobile responsive. As well, avoid themes with a sliding bar on the homepage, they may look pretty but these slow down your site a lot!
One of the fastest themes that’s also mobile responsive (and quite customizable) is Astra.
That’s the one I’m planning on changing mine to soon.
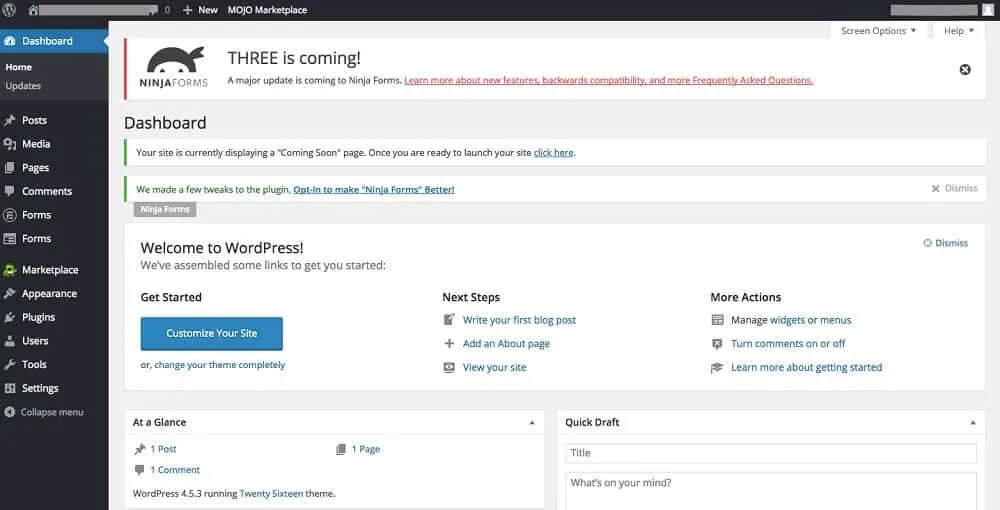
To install a new theme on your site, navigate to Apperance in the left hand menu and select Themes. Take a look around at all the free themes and pick the one you love!
STEP 6 INSTALL PLUGINS
Plugins are basically software that allows you to add specific elements to your website without needing to know how to code. There’s a plugin for practically everything and anything you want to do.
That being said, don’t just add every plugin you see. Plugins can and do slow your website but some are essential and others aren’t. So be picky and choosy with your plugins.
They’re really easy to install. Just navigate over to Plugins on the left hand menu, and select Add New. You’ll be able to search for different plugins, then hit install and then activate plugin and you’re done!
Here’s a list of essential plugins I recommend starting off with:
♡ Grow by Mediavine – this is a social sharing plugin that will allow your visitors to share your posts on Facebook, Pinterest, Twitter and whatever else you choose
♡ Yoast SEO – this one helps you with technical things like sitemaps and other things that are needed to rank on google
♡ ShortPixel Image Optimizer – this one compresses your images so they don’t take up as much space and they load faster
♡ Caching Plugin – there are tons to choose from- it basically keeps a static image stored for users who repeatedly visit your website so it loads faster – I use WP Rocket for this but there are other free options as well
♡ WordFence Security – to help keep your site secure and safe from hackers
♡ AmalinksPro – one of the ways I make money on the blog (aside from the ads) is through affiliate marketing. This is basically getting paid by companies for sending them leads that then lead to a sale. My #1 affliate program is Amazon and this awesome plugin helps you get more clicks and sales, plus makes it so much easier to grab links from amazon while you’re writing your posts.
If you’re planning to add Amazon affiliates (which I think you definitely should), then you’ll most definitely want to get this plugin to help you convert your blog visitors into buyers!
STEP 7 SET UP GOOGLE ANALYTICS + GOOGLE SEARCH CONSOLE (THE RIGHT WAY)
In order to track your website’s views and growth over time, make sure to set up google analytics and search console right from the get go.
I didn’t know how to do this and lost months of data. Plus, when I did attempt it, I used plugins to do it.
Don’t do that!
It slows your site and if the plugin is every down you lose that data.
Instead, you should install it the right way without unnecessary plugins.
This one has quite a few steps.
I highly recommend using this awesome guide by pro blogger Tracy Fobes.
This is the one I used to finally set it up the right way.
HOW TO START A MOM BLOG AND MAKE MONEY
Yay! You did it!
You’ve officially started a mom blog and you can start earning some cash!
Start thinking about your first post and get writing. Think about how you can help your audience and provide value. This is how you make money blogging.
You need to focus on solving problems your audience faces.
You can make money on your blog by recommending appropriate products that could solve their issues, this is affiliate marketing. You’ll want to sign up as an affiliate with companies and start promoting products. I suggest starting with Amazon affiliates, that was my first one.
You can also make some awesome money with ads on your website. Focus on creating great posts and getting traffic to your new mom blog, eventually you’ll be able to apply to an ad network and make some extra cash that way.
Just remember, this is a marathon, not a race! You’ll have to put in the time and work but eventually it does pay off.
Most bloggers give up within the first 6 months because they don’t’ see the money.
Don’t give up! It takes time. I didn’t see a full time income until just over a year blogging.
Good luck! You got this!
Got any questions about how to start a mom blog?
Leave those for me below and I’ll try my best to help 🙂

pranita deshpande
Monday 10th of August 2020
How nice effort you have taken. I am feeling for a moment that you are telling importance of blogging with these points orally.
Deborah
Monday 3rd of August 2020
Thanks so much for sharing information on starting a new blog. I have had issues with a slow loading page since moving my site to Wordpress, so I am excited to try the ShortPixel Image Optimizer! Thanks again for sharing your experience.
Ana Smith
Sunday 2nd of August 2020
I highly recommend any mom who's considering options for starting a blog to read this post.
Beth
Sunday 2nd of August 2020
This is such a great, clear summary of your path, with some great tips. I see a few things I can work on, for sure - thanks!
Tamera
Sunday 2nd of August 2020
I love how detailed this post is! These are some really great tips.